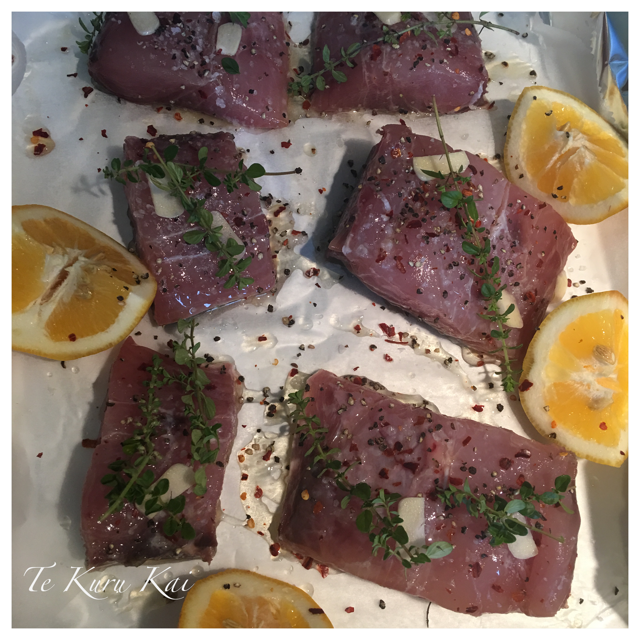
A good friend of ours gave some beautiful fillets of kingfish after a day out on the boat in Raglan. I love kingfish and decided to give this new recipe a go.
Ingredients
500 - 750 grams of filled kingfish
2 x garlic cloves, peeled and thinly sliced
1 x lemon
Some fresh thyme
Cracked pepper
Sea salt
Chilli Flakes
Splash of Olive Oil
Method
Preheat the oven to 200°C.
Cut the fillets into serving pieces and give them a thin coating of olive oil. Place them into a lined baking tray, skin down, then sprinkle with lemon juice, salt, pepper, garlic slices and chilli flakes.
Bake uncovered in the oven for approximately 15-20 minutes or until cooked.
Serve with a beautiful green salad with watercress, baby spinach and kale, and a mild vinaigrette dressing.
Serves 2-4 people
Happy living peeps!
Sunday, May 21, 2017
Tuesday, May 16, 2017
Moana Birthday Cake
I was asked last year to make a cake by a whanau member for their baby. Unfortunately I was unable to accommodate due to my study, but when the tono came through for this year I was more than happy to oblige. The brief was a Moana cake with buttercream.
As always, I am keen for a challenge and decided to do something extra special!
The board was massive measuring 600 mm x 600 mm. The sea, land and flowers were made with fondant, while the sand and texture of the cake was made with biscuit crumb ... and a whole lot of buttercream.
I was so excited with the project and extremely happy with the final result.
Happy learning peeps!
As always, I am keen for a challenge and decided to do something extra special!
I was so excited with the project and extremely happy with the final result.
Happy learning peeps!
Sunday, May 14, 2017
Coffee Filter Craft
I've been asked by a few people about the decorations that we used for my daughters 21st birthday last year; in particular the 21 sign.
To be honest, the final design was nothing like the original brief that the girls wanted.
When I sat down with them to go over their plans, the first option was a feature wall totally covered with fresh white flowers. Hmmm, unfortunately this did not fit within the budget, so they needed to be more creative in their ideas.
The second option presented was a feature wall totally covered with fresh hydrangeas. I was pretty impressed with their case, considering the plan was to pick the hydrangeas roadside because they are everywhere on the side of the road were we live. Unfortunately the birthday was in the middle of winter so hydrangeas via roadside was not an option.
The third option was artificial flowers, store brought ready to glue onto the feature wall. Turned out, this was a more expensive option than having fresh brought flowers.
The fourth and final option was to create their own artificial flowers. A much cheaper but more importantly, a more creative option. Now to find the materials.
When we cleaned out the shed to make room for the party, we found an old sheet of chipboard and a piece of polystyrene which the girls used as the base and cut out the numbers.
With the help of their father, the numbers were secured to the boards, however not fully flush to the board because they wanted fairy lights behind the piece.
Now for the flowers. A quick search on pinterest was needed and they found an easy way of making the flowers using large commercial coffee filters, hot glue and existing paint that was watered down.
The instructions said to fold the filters into quarters and cut into shape, but the girls simply played around with them until they got the look they were after using approximately 6 filters per flower, then twisting the bottom of each flower to keep it all together.
The instructions also showed the girls how to dye to flowers prior to forming the shape, however the girls improvised, dabbing watered down paint onto the edges of the flowers. As the filters absorb easily, there was very little paint needed.
The flowers then needed time to dry, which gave us time to give the chipboard a quick coat of black paint.
Then it was time to glue them onto the numbers and add the fairy lights.
I have very impressed with the final product, and the effort the girls put in to making a creative, affordable option that went so well with all the other decorations for the party.
Happy living peeps!
To be honest, the final design was nothing like the original brief that the girls wanted.
When I sat down with them to go over their plans, the first option was a feature wall totally covered with fresh white flowers. Hmmm, unfortunately this did not fit within the budget, so they needed to be more creative in their ideas.
The second option presented was a feature wall totally covered with fresh hydrangeas. I was pretty impressed with their case, considering the plan was to pick the hydrangeas roadside because they are everywhere on the side of the road were we live. Unfortunately the birthday was in the middle of winter so hydrangeas via roadside was not an option.
The third option was artificial flowers, store brought ready to glue onto the feature wall. Turned out, this was a more expensive option than having fresh brought flowers.
The fourth and final option was to create their own artificial flowers. A much cheaper but more importantly, a more creative option. Now to find the materials.
When we cleaned out the shed to make room for the party, we found an old sheet of chipboard and a piece of polystyrene which the girls used as the base and cut out the numbers.
With the help of their father, the numbers were secured to the boards, however not fully flush to the board because they wanted fairy lights behind the piece.
Now for the flowers. A quick search on pinterest was needed and they found an easy way of making the flowers using large commercial coffee filters, hot glue and existing paint that was watered down.
The instructions said to fold the filters into quarters and cut into shape, but the girls simply played around with them until they got the look they were after using approximately 6 filters per flower, then twisting the bottom of each flower to keep it all together.
The instructions also showed the girls how to dye to flowers prior to forming the shape, however the girls improvised, dabbing watered down paint onto the edges of the flowers. As the filters absorb easily, there was very little paint needed.
The flowers then needed time to dry, which gave us time to give the chipboard a quick coat of black paint.
Then it was time to glue them onto the numbers and add the fairy lights.
I have very impressed with the final product, and the effort the girls put in to making a creative, affordable option that went so well with all the other decorations for the party.
Happy living peeps!
Tuesday, April 11, 2017
Roasted Chicken with Lemon and Garlic
I make no secret that I am a fan of Nigella and her no fuss way of cooking. When I had a chicken in the fridge and wanted to try something different that required very little effort, I gave my spin on her slow roasted garlic and lemon chicken a go.
It really does take a matter of minutes to prepare, and then you let the oven do the rest of the work. The intense lemon flavour is amazing although try to use unwaxed lemons so the flavour isn't too tart.
You may want to serve it with some mashed potatoes or kumara to soak up all those lovely juices although I simply served it with a beautiful green leafy salad, using the juices as a dressing.
If you don't have a whole chicken, then simply use chicken pieces.
Ingredients
1 x whole chicken cut into 10 pieces
Unpeeled garlic cloves from 1 large head of garlic
2 lemons roughly cut
Some fresh thyme
Enough Olive Oil to coat
1/2 - 2/3 cup of white wine (extras you can drink while you wait)
Black pepper
Method
Preheat the oven to 160°C.
Place the first 5 ingredients into a roasted dish and toss until the chicken is nicely coated. Sprinkle over the white wine followed by the black pepper, then cover tightly with foil and place into the oven for approximately 2 hours.
Remove the foil, increase the heat to 200°C and cook uncovered for a further 20-30 minutes. Keep an eye on the chicken at this stage as the smaller pieces of chicken can dry out.
Serve and devour!
Happy living peeps!
Tuesday, March 28, 2017
The Outhouse Gets A New Floor
In the quest to revive the outhouse and turn it into a relaxing living space, we had to tackle the challenge of the floor. With my creative hat, the floor was lovely and textured, creating character however realistically it did not fit the brief of the vision at all. It needed to be levelled because the idea was to add carpet and tiles.
Gig and I toyed with the concept of using levelling compounds that were on the market, but after consulting with a concrete specialist, we settled on a layer of concrete. A challenge? Yes! Out of the question? Never!
The colour chosen is a greenish grey colour which was inspired by the wallpaper that I blogged about in RENOVATING HATE.
Happy learning peeps!
Gig and I toyed with the concept of using levelling compounds that were on the market, but after consulting with a concrete specialist, we settled on a layer of concrete. A challenge? Yes! Out of the question? Never!
| Before |
| Waiting for the floor to dry |
| From the front door |
| Add underlay and carpet! |
Happy learning peeps!
Sunday, March 26, 2017
#pikitiaotera
For xmas I received a gift from my very good friend Sheryl Peters. It was a memory jar, which basically is a large jar containing a couple of post it note pads, a pen The idea is to capture a memory, then at some stage in the future, you open the jar and reflect back. I thought this was such a wonderful idea!
Over the xmas break I decided to introduce some innovation to my gift by creating #pikitiaotera on my social media accounts which captures the context of Sheryl's gift. Why? Firstly, I am not carrying the jar around with me! Secondly and more importantly, someone told me that 2017 would be a year for opportunities for me, so I wanted to see just how many moments I am able to capture ... using pictures which speak 1000 words. Here's a snapshot of a few that I have captured.
I admit that I am not capturing a pic everyday, however I am enjoying the challenge.
Follow me on instagram #bungnut, snapchat #bungybut (not that is not a typo), twitter @bungynut or my facebook page Live Love Learn @bungynut.
Happy living peeps!
Over the xmas break I decided to introduce some innovation to my gift by creating #pikitiaotera on my social media accounts which captures the context of Sheryl's gift. Why? Firstly, I am not carrying the jar around with me! Secondly and more importantly, someone told me that 2017 would be a year for opportunities for me, so I wanted to see just how many moments I am able to capture ... using pictures which speak 1000 words. Here's a snapshot of a few that I have captured.
I admit that I am not capturing a pic everyday, however I am enjoying the challenge.
Follow me on instagram #bungnut, snapchat #bungybut (not that is not a typo), twitter @bungynut or my facebook page Live Love Learn @bungynut.
Happy living peeps!
Wednesday, March 8, 2017
Vintage Jelly Moulds To Vintage Lights Shades
I have a few vintage jelly moulds that I have collected over the years, which stems from my wonderful memories growing up with my grandmothers collection of catering equipment. The idea with the jelly moulds was to make some form of lighting. Right now I can hear my sister Deanne groaning about hoarding all my collectables :-)
The renovation of the outhouse gave the perfect opportunity to put this plan into action. I found the right light fittings to compliment the overall vision of the project and with the help of my fabulous husband - Gig, we got to work. We utilised the smaller moulds for the fittings on the ceiling, and the slightly bigger mould for the shade themselves. Luckily for me, Gig is an electrician so with a few holes in each mould, he connected everything perfectly and I am absolutely thrilled with the finished product.
I have recieved a few comments about not having matching jelly moulds for both shades, but I don't really have any OCD issues with them. In fact, non matching shades adds to the character of the outhouse overall.
Happy learning peeps!
The renovation of the outhouse gave the perfect opportunity to put this plan into action. I found the right light fittings to compliment the overall vision of the project and with the help of my fabulous husband - Gig, we got to work. We utilised the smaller moulds for the fittings on the ceiling, and the slightly bigger mould for the shade themselves. Luckily for me, Gig is an electrician so with a few holes in each mould, he connected everything perfectly and I am absolutely thrilled with the finished product.
I have recieved a few comments about not having matching jelly moulds for both shades, but I don't really have any OCD issues with them. In fact, non matching shades adds to the character of the outhouse overall.
Happy learning peeps!
Sunday, March 5, 2017
Renovating Hate
Over the years of renovating homes, there's definitely one job that I have discovered I hate the most; stripping old wallpaper - particularly when the wallpaper I am stripping is wallpaper over wallpaper over wallpaper over more wallpaper, which is painted. Eeeek!
Imagine the horror when I announced to my husband that I wanted to wallpaper the back wall of the outhouse, with not just any wallpaper, but with vintage wallpaper.
The wall itself wasn't that big, so I figured that I would only need about 4 rolls of wallpaper. I hunted high and low for the right design, then found what I was looking for on trademe. An old interior design business was selling all their stock for a great price. I ran the design past my husband Gig, and hit BUY NOW!
It is not quite everyone's cup of tea, but I think it looks wonderful. Although the wallpaperers were not that impressed.
The photos do not give the wallpaper justice as the colours are beautiful which gave me inspiration for the rest of the decor for the outhouse.
Happy learning peeps!
Imagine the horror when I announced to my husband that I wanted to wallpaper the back wall of the outhouse, with not just any wallpaper, but with vintage wallpaper.
The wall itself wasn't that big, so I figured that I would only need about 4 rolls of wallpaper. I hunted high and low for the right design, then found what I was looking for on trademe. An old interior design business was selling all their stock for a great price. I ran the design past my husband Gig, and hit BUY NOW!
It is not quite everyone's cup of tea, but I think it looks wonderful. Although the wallpaperers were not that impressed.
| Starting to go up .. believe it or not, this is over an hours work! |
| Finished Product .... 4 hours later! |
| With the painted walls and carpet |
The photos do not give the wallpaper justice as the colours are beautiful which gave me inspiration for the rest of the decor for the outhouse.
Happy learning peeps!
Friday, December 30, 2016
Chocolate Berry Pav
This recipe is to die for!! The pav is lovely and crisp with a delicately chewy centre which I love and as an added bonus – it’s chocolate, something else I just can’t get enough of.
You can do this dessert all year round and I have experimented with a variety of toppings. In the summer I love to use fresh raspberries and/or blackberries and/or strawberries and in the winter I mix a drained tin of boysenberries in with the cream itself which provides a completely different twist. For a berry overload use the boysenberry cream and then top with fresh berries. I’ve even made miniature chocolate berry meringues to complete a finger food theme for my brother in laws party and I can tell you that they really went down a treat that night. Whatever the combination, I just know that you’ll love this delicious dessert.
Meringue
6 egg whites
300g castor sugar
3 tablespoons cocoa powder
75g finely chopped dark chocolate
1 teaspoon of white wine vinegar or balsamic vinegar
Topping
500ml cream
500g of fresh berries
50g grated chocolate
To make the meringue
Preheat the oven to 180°C.
Beat egg whites until they form peaks and then gently add the sugar little by little until the egg whites are stiff. Add the cocoa, chocolate & vinegar to the mixture and then gently fold until everything is nicely combined.
Place mixture on a lined baking tray. Put into the oven, then immediately turn the temperature to 150 °C.
Bake for 1 to 1 ½ hours or until the crust is crisp and you can still feel softness in the centre. Once cooked, turn off the heat and leave the pav to cool inside the oven with the door left slightly open which should take about 1 hour.
To make the topping:
Whip the cream until nice and soft and top the cooled pav with the cream. Delicately toss the fresh berries all over the top of the cream until you’re happy with what it looks like. Top with the grated chocolate and then serve.
Serves 8-10 people.
Thursday, December 29, 2016
Gorgeous Cabinet Gets Makeover x 2
Nearly two years ago, I acquired this lovely side table which was made out of a jarrah hardwood. When I first started out with planning what I was going to do with it, I knew I wanted to paint the inside green. Which is exactly what I did. I painted the inside in ASCP Antibes Green and finished it with clear wax.
With the inside complete, I then went on to paint the whole exterior ASCP Graphite with dark wax. When it was all finished, I was happy initially, but then realised that it didn't give this beautiful piece the makeover it truly deserved.
I pondered on this for quite a while until I found this beautiful piece of vintage wallpaper that inspired me to redo it all over again. I kept the top of the piece graphite, but change the exterior to ASCP Olive with the vintage wallpaper on the front of the door.
The piece sits right at the front door entrance and I pretty happy with the final results.
Happy living peeps!
With the inside complete, I then went on to paint the whole exterior ASCP Graphite with dark wax. When it was all finished, I was happy initially, but then realised that it didn't give this beautiful piece the makeover it truly deserved.
I pondered on this for quite a while until I found this beautiful piece of vintage wallpaper that inspired me to redo it all over again. I kept the top of the piece graphite, but change the exterior to ASCP Olive with the vintage wallpaper on the front of the door.
| Before the first make over |
| Second makeover complete |
Happy living peeps!
Subscribe to:
Posts (Atom)