A good friend of ours gave some beautiful fillets of kingfish after a day out on the boat in Raglan. I love kingfish and decided to give this new recipe a go.
Ingredients
500 - 750 grams of filled kingfish
2 x garlic cloves, peeled and thinly sliced
1 x lemon
Some fresh thyme
Cracked pepper
Sea salt
Chilli Flakes
Splash of Olive Oil
Method
Preheat the oven to 200°C.
Cut the fillets into serving pieces and give them a thin coating of olive oil. Place them into a lined baking tray, skin down, then sprinkle with lemon juice, salt, pepper, garlic slices and chilli flakes.
Bake uncovered in the oven for approximately 15-20 minutes or until cooked.
Serve with a beautiful green salad with watercress, baby spinach and kale, and a mild vinaigrette dressing.
Serves 2-4 people
Happy living peeps!
Sunday, May 21, 2017
Tuesday, May 16, 2017
Moana Birthday Cake
I was asked last year to make a cake by a whanau member for their baby. Unfortunately I was unable to accommodate due to my study, but when the tono came through for this year I was more than happy to oblige. The brief was a Moana cake with buttercream.
As always, I am keen for a challenge and decided to do something extra special!
The board was massive measuring 600 mm x 600 mm. The sea, land and flowers were made with fondant, while the sand and texture of the cake was made with biscuit crumb ... and a whole lot of buttercream.
I was so excited with the project and extremely happy with the final result.
Happy learning peeps!
As always, I am keen for a challenge and decided to do something extra special!
I was so excited with the project and extremely happy with the final result.
Happy learning peeps!
Sunday, May 14, 2017
Coffee Filter Craft
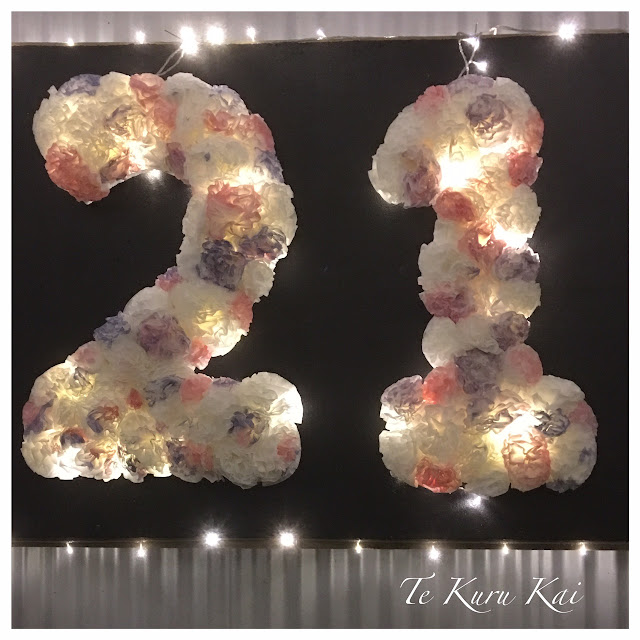
I've been asked by a few people about the decorations that we used for my daughters 21st birthday last year; in particular the 21 sign.
To be honest, the final design was nothing like the original brief that the girls wanted.
When I sat down with them to go over their plans, the first option was a feature wall totally covered with fresh white flowers. Hmmm, unfortunately this did not fit within the budget, so they needed to be more creative in their ideas.
The second option presented was a feature wall totally covered with fresh hydrangeas. I was pretty impressed with their case, considering the plan was to pick the hydrangeas roadside because they are everywhere on the side of the road were we live. Unfortunately the birthday was in the middle of winter so hydrangeas via roadside was not an option.
The third option was artificial flowers, store brought ready to glue onto the feature wall. Turned out, this was a more expensive option than having fresh brought flowers.
The fourth and final option was to create their own artificial flowers. A much cheaper but more importantly, a more creative option. Now to find the materials.
When we cleaned out the shed to make room for the party, we found an old sheet of chipboard and a piece of polystyrene which the girls used as the base and cut out the numbers.
With the help of their father, the numbers were secured to the boards, however not fully flush to the board because they wanted fairy lights behind the piece.
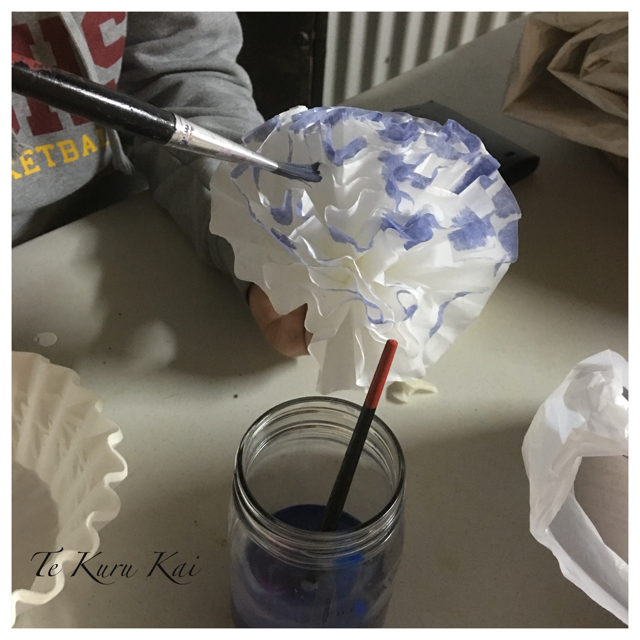
Now for the flowers. A quick search on pinterest was needed and they found an easy way of making the flowers using large commercial coffee filters, hot glue and existing paint that was watered down.
The instructions said to fold the filters into quarters and cut into shape, but the girls simply played around with them until they got the look they were after using approximately 6 filters per flower, then twisting the bottom of each flower to keep it all together.
The instructions also showed the girls how to dye to flowers prior to forming the shape, however the girls improvised, dabbing watered down paint onto the edges of the flowers. As the filters absorb easily, there was very little paint needed.
The flowers then needed time to dry, which gave us time to give the chipboard a quick coat of black paint.
Then it was time to glue them onto the numbers and add the fairy lights.
I have very impressed with the final product, and the effort the girls put in to making a creative, affordable option that went so well with all the other decorations for the party.
Happy living peeps!
Subscribe to:
Comments (Atom)


